

This is going to be a bit of a follow-up on an earlier article
on Cloudflare SSH tunneling where we configured
SSH-tunneling
through Cloudflare’s WARP-client.
In this article we’ll configure Cloudflare’s cloudlared-tunnel and a Zero Trust Application to expose a browser
rendered terminal to our server.
Exposing a terminal openly on the web is usually not a great idea — maybe even less so through a browser, which is why we’ll add authentication before the usual protective measures for SSH-connections.
Setting up cloudflared#
In the previous article we configured the tunnel through the Dashboard, or so called ClickOps. Personally I think ClickOps is fine when doing exploratory work, but for long-running processes a more declarative and reproducible approach is preferred.
First we need to create a credentials.json file for our tunnel.
Assuming you’ve already created an origin certificate by logging in with
cloudflared tunnel loginyou can create the credentials file for a new tunnel by running
cloudflared tunnel create <name>which should create a tunnel credentials file in the same place as your origin certificate. The name of the file will be the same as the Tunnel ID.
Next we’ll write the configuration for our newly created tunnel, basing it on the official documentation.
# Name of tunnel
tunnel: <name>
# Path to the credentials file we just created
credentials-file: <path/to/credentials/file.json>
# Port to expose metrics on
metrics: 0.0.0.0:2000
# We're going to start this as a container, so there's no point in auto-updating the daemon inside the container
no-autoupdate: true
# Enable warp-routing to expose a private network
warp-routing:
  enabled: true

ingress:
  # A simple test service to verify that everything is working as intended
  - hostname: hello.<example.com>
    service: hello_world
  # Domain-name to expose SSH-connection on and host machine IP
  - hostname: ssh.<example.com>
    service: ssh://<host-ip>:22
  # Service for matching all other URLs
  - service: http_status:404
Since our cloudflared-tunnel is going to run inside a Kubernetes-cluster we need to supply the local IP of the
host-machine we want to connect to.
This will also work if we run the daemon directly on the machine.
To test our configuration we can run the tunnel natively (not inside a container) on the machine we want to browser access to.
cloudflared tunnel --config config.yaml runIf successful the tunnel should show up as Healthy in your Zero Trust Cloudflare dashboard under Access > Tunnels.

Copy the Tunnel ID as we need it for the next step.
DNS records and routing#
Assuming your tunnel is healthy the next step is to route traffic through it. This can be done by adding a CNAME record to your DNS. From the Cloudflare Dashboard navigate to DNS > Records.
To test your tunnel add a record for the hello_world service.
Select CNAME as Type,
Name should match the hostname for the hello_world service in your tunnel configuration,
and Target should be <tunnelID>.cfargotunnel.com.1

After adding the DNS record a Route should be visible in the Zero Trust tunnels dashboard,
and you should be able to navigate to your hello_world service at the name you entered as the DNS record.
Great! 🎉
Now that we know the test-service works we can add our SSH-service in the same way, i.e.
| Type | Name | Target |
|---|---|---|
CNAME | ssh | <tunnelID>.cfargotunnel.com |
Zero Trust Application#
Now that we have a test service up and running we can add a Zero Trust Application which will be our gateway to the browser rendered terminal.
In Zero Trust navigate to Access > Applications and click on + Add application to get started. We want a Self-hosted application which we are going to configure to be our browser rendered terminal.
Enter a descriptive Application name and reuse the same subdomain as in your cloudflared SSH-service and DNS record.
Scroll down to Identity providers and select the ones you want to use to authenticate with your Zero Trust Application. If you haven’t added any only One-time PIN will be available. Multiple authentication methods can be configured in Zero Trust under Settings > Authentication for easier login.2
Continue to the next screen to configure access policies. A simple allow policy with a default group should suffice. If you need a special group for this purpose you can create one under Access Groups. Make sure the account you’re trying to use your application with is part of the group, e.g. if you have set up GitHub as an identity provider the e-mail you use for GitHub should be part of an access group allowed to use the application.
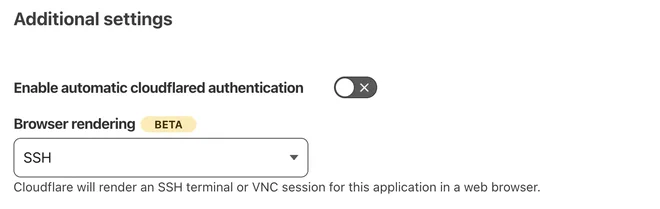
On the next screen scroll down and locate the Additional settings card where you’ll find Browser rendering.
And that’s it!
You should now be able to access a browser rendered terminal for your server on the hostname you configured. After authenticating with your trusted provider with an allowed account you’ll be prompted to supply a local username followed by valid credentials.3
Terminal rendered SSH#
A browser rendered terminal is fine and all, but I assume you’d also like to connect to your server using the same URL. By using cloudflared access you can do just this!
Start
by installing cloudflared
on your client machine and open ~/.ssh/config to add
Host <hostname>
    HostName ssh.<example.com>
    IdentityFile ~/.ssh/<private-key-file>
    ProxyCommand cloudflared access ssh --hostname %h
    User <user>
filling in all the <angle-brackets> with your relevant details.
You should now be able to run ssh <hostname> to securely connect to your server 🔐
If you’re met with a bad handshake error, e.g.
> ssh <hostname>
2023-09-24T11:18:16Z ERR failed to connect to origin error="websocket: bad handshake" originURL=https://ssh.example.com
websocket: bad handshake
it means your client doesn’t trust the host certificate. This can be solved by enabling Cloudflare’s WARP Client which I’ve written about in Cloudflare SSH tunneling.
Tying it all together#
Now that we have our proof of concept up and running the next step is getting it inside our cluster.
A simple deployment for cloudflared looks like
apiVersion: v1
kind: Namespace
metadata:
  name: cloudflared
---
apiVersion: apps/v1
kind: Deployment
metadata:
  name: cloudflared
  namespace: cloudflared
spec:
  replicas: 2
  selector:
    matchLabels:
      app: cloudflared
  strategy:
    type: RollingUpdate
    rollingUpdate:
      maxSurge: 1
      maxUnavailable: 0
  template:
    metadata:
      labels:
        app: cloudflared
    spec:
      containers:
        - name: cloudflared
          image: cloudflare/cloudflared:2023.8.2
          imagePullPolicy: IfNotPresent
          args:
            - tunnel
            - --config
            - /etc/cloudflared/config/config.yaml
            - run
          livenessProbe:
            httpGet:
              path: /ready
              port: 2000
            initialDelaySeconds: 60
            failureThreshold: 5
            periodSeconds: 10
          volumeMounts:
            - name: cloudflared-config
              mountPath: /etc/cloudflared/config/config.yaml
              subPath: config.yaml
            - name: tunnel-credentials
              mountPath: /etc/cloudflared/creds
              readOnly: true
      restartPolicy: Always
      volumes:
        - name: cloudflared-config
          configMap:
            name: cloudflared-config
        - name: tunnel-credentials
          secret:
            secretName: tunnel-credentials
where you have to supply your tunnel credentials in a base64 encoded secret as
apiVersion: v1
kind: Secret
metadata:
  name: tunnel-credentials
  namespace: cloudflared
type: Opaque
data:
  credentials.json: <+++++++>
and configure it using a ConfigMap with your own hostname
apiVersion: v1
kind: ConfigMap
metadata:
  name: cloudflared-config
  namespace: cloudflared
data:
  config.yaml: |-
    tunnel: ssh
    credentials-file: /etc/cloudflared/creds/credentials.json
    metrics: 0.0.0.0:2000
    no-autoupdate: true
    warp-routing:
      enabled: true
    ingress:
      - hostname: ssh.<example.com>
        service: ssh://192.168.1.12:22
      - service: http_status:404
This set up can of course also tunnel more than just ssh-traffic.
I’m currently using cloudflared together with Traefik,
something I plan to write an article about at a later date.
A DNS record is added automatically if the tunnel is managed from the Zero Trust dashboard, but since we’re using a different approach we need to add it manually. ↩︎
https://developers.cloudflare.com/cloudflare-one/identity/idp-integration/ ↩︎
I recommend disabling password authentication by editing
/etc/ssh/sshd_configwithPasswordAuthentication noand restarting the ssh-server. ↩︎