


In my previous article we took a look at how to bootstrap K3s with Cilium starting from a fresh Debian 12 network installation.
Having recently started to play around with Proxmox Virtual Environment, I feel the natural progression is to get to know OpenTofu/Terraform and Cloud-init to automatically provision virtual machines for a Kubernetes cluster.
In this article we’ll create a two-node cluster with one control-plane node and one worker node as a proof-of-concept. As an extra challenge we’ll also take a look at how to do PCIe passthrough for the worker node.
To create our cluster we’ll be using kubeadm to do the heavy lifting. If you really want to get your hands dirty there’s Kelsey Hightower’s Kubernetes the Hard Way, and similar guides inspired by it, like this one for Proxmox/KVM.
Proxmox Virtual Environment#
This article is written for an Intel N100 based mini-PC (ASUS PN42) with 32 GB RAM and 1 TB storage. As a hypervisor I’m using Proxmox Virtual Environment 8.1.


To get started with Proxmox simply follow the steps in the official documentation. I found this article by Derek Seaman powered by tteck’s Proxmox scripts to be a great introduction to Proxmox (and Home Assistant).
I recommend running the post-installation script
bash -c "$(wget -qLO - https://github.com/tteck/Proxmox/raw/main/misc/post-pve-install.sh)"mentioned in the above article. This will guide you through a couple of steps to set up the non-enterprise repositories if you’re not ready to support Proxmox with your money just yet.
Lastly I’d suggest enabling 2FA and taking a look at Derek’s other article on TLS certificates for Proxmox.
Debian (OS)#
In this article we’ll be using the generic cloud image of Debian 12 Bookworm.


Different Linux distro like Ubuntu, Rocky Linux, OpenSUSE, or Arch Linux should also work, but some steps wil probably differ.
There’s also Talos Linux, an immutable OS purpose-built for Kubernetes which I plan to try in the near future.
OpenTofu (Terraform)#
Without going into too many details, OpenTofu was created after Hashicorp’s switch from an open-source license to the BUSL. In OpenTofu’s own words it’s "[…] a fork of Terraform that is open-source, community-driven, and managed by the Linux Foundation."


At this point in time
— and for our purposes, they’re interchangeable.
I personally prefer OpenTofu,
and will stick with it in this article.
If you prefer Terraform just replace every tofu command with terraform.
For instructions on how to install OpenTofu follow their documentation here. If you’re partial to Terraform you can grab that from here.
We’ll be using the Terraform Provider for Proxmox maintained by Pavel Boldyrev to provision and configure our VMs using Proxmox and Cloud-init.
Cloud-init#
Cloud-init is a way of bootstrapping a virtual machines in a similar fashion as PXE-boot for physical hardware.


Maintained by Canonical, Cloud-init is cited as the de facto standard for the initial setup of virtual machines in the cloud, and ensures repeatable and efficient way to provision systems.
Kubeadm#
Kubeadm is a tool for creating Kubernetes clusters following best-practices.

We’ll configure our Kubernetes cluster using kubeadm during the cloud-init phase.
Another option would be to wait for cloud-init to finish and then apply an Ansible playbook.
Cilium#
Cilium — with it’s eBPF 🐝 goodness, is currently the hottest CNI-plugin for Kubernetes (IMHO).


I was skeptical after Isovalent — the creators of Cilium, announced that they were being acquired by Cisco. Though seeing as the Cilium is a CNCF project, and after speaking to some of the involved people at KubeCon in Paris last week, that skepticism is gone.
Configuration#
In this section I try to explain my configuration choices, if you just want to see the full configuration go to the Summary section.
I’m fairly new to Proxmox, and I’m by no means a Terraform expert. If you think something can be done better — especially if I’m doing something plain wrong, I’d be more than happy to hear from you!
PCI passthrough#
We want to be able to pass through PCIe devices like NICs and GPUs to our VMs. Following the Proxmox wiki we must first enable IOMMU support in the BIOS. The setting could also be called VT-d.
If you’re using an Intel CPU you also need to add intel_iommu=on on
the kernel command line.
If you’re using GRUB as your bootloader you can add intel_iommu=on to the GRUB_CMDLINE_LINUX_DEFAULT variable in
/etc/default/grub and run
update-grubIf you see
W: This system is booted via proxmox-boot-tool:you’re not using GRUB as the bootloader,
but Systemd-boot.
This means you should add intel_iommu=on in the /etc/kernel/cmdline file instead.
If your hardware supports IOMMU passthrough mode you can also add iommu=pt to possibly increase performance.
Save your edits and run
proxmox-boot-tool refreshto update the bootloader.
After a restart run
dmesg | grep -e DMAR -e IOMMUIf PCI passthrough is successfully enabled you should now see
DMAR: IOMMU enabledin your terminal.
The host OS can’t use the PCIe device at the same time as the guest OS. To make sure the host doesn’t try to use the PCIe device you want to use you can put the drivers on a deny-list. See the Proxmox wiki for details on how to deny the host the use of GPUs, e.g.
echo "blacklist i915" >> /etc/modprobe.d/blacklist.conffor Intel GPUs.
Disk passthrough#
Although it’s recommended to provision storage through the hypervisor — and if you can’t pass through the whole storage controller, it’s possible to pass through physical disks.
To do this you can e.g. run
lsblk | awk 'NR==1{print $0" DEVICE-ID(S)"}NR>1{dev=$1;printf $0" ";system("find /dev/disk/by-id -lname \"*"dev"\" -printf \" %p\"");print "";}' | grep -v -E 'part|lvm'to get the disk ID.
With the disk ID at hand run
qm set <VM_ID> -scsi2 /dev/disk/by-id/<DISK_ID>on the Proxmox host machine to pass through the chosen DISK_ID to the given VM_ID.
From what I know this can’t be done through the GUI.
Provider#
Create a main.tf file and list the required providers.
For this project we’ll only need the bpg/proxmox provider.
# main.tf
terraform {
  required_providers {
    proxmox = {
      source  = "bpg/proxmox"
      version = "0.50.0"
    }
  }
}
Next we need to configure said provider.
I’ve given the provider the alias euclid after the hostname of the mini-PC I’m running this on,
which again is inspired by the Greek mathematician Euclid.
By giving the provider an alias we can potentially control multiple Proxmox instances using the same Terraform
configuration.
# main.tf
provider "proxmox" {
  alias    = "euclid"
  endpoint = var.euclid.endpoint
  insecure = var.euclid.insecure

  api_token = var.euclid_auth.api_token
  ssh {
    agent    = true
    username = var.euclid_auth.username
  }

  tmp_dir = "/var/tmp"
}
The connection details are separated into variables as I prefer to not check those into Git.
# variables.tf
variable "euclid" {
  description = "Euclid Proxmox server configuration"
  type        = object({
    node_name = string
    endpoint  = string
    insecure  = bool
  })
}
To automatically insert variables when running tofu-commands,
you can add them to a variables.auto.tfvars file.
See the documentation for more
options on how to supply variables to Terraform files.
# variables.auto.tfvars
euclid = {
  node_name = "euclid"
  endpoint  = "https://192.168.1.42:8006"
  insecure  = true
}
Here I’ve set the endpoint to the local network IP address of the Proxmox node. If you’ve set up a certificate for your Proxmox mode you can instead use a URL backed by the certificate and disable insecure mode. See this article on how to mint a TLS certificate for your Proxmox instance.
I’ve opted for SSH and an API token for authentication.
Since I’m lazy I’ve also reused the default root user.
If you’re running Proxmox in any kind of production environment I highly suggest you create a separate user with only
the necessary privileges!
# variables.tf
variable "euclid_auth" {
  description = "Euclid Proxmox server auth"
  type        = object({
    username  = string
    api_token = string
  })
  sensitive = true
}
To generate an API token for Proxmox, navigate to Permissions > API Token under the Datacenter menu. As an (unsafe) shortcut you can untick the Privilege Separation box to give the token the same privileges as the user — again, this is not preferred in any kind of production environment!
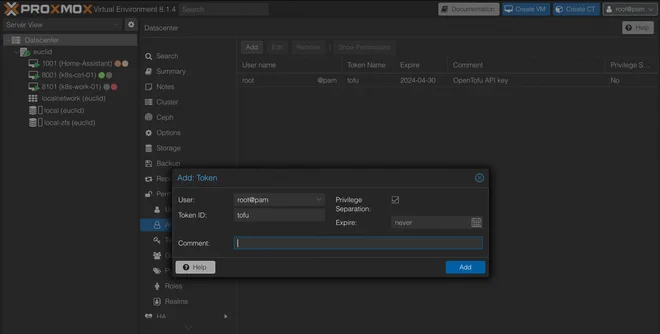
After generating the token,
add it as <USER>!<TOKEN_NAME>=<TOKEN_SECRET> as shown below.
# variables.auto.tfvars
euclid_auth = {
  username  = "root"
  api_token = "root@pam!<TOKEN_NAME>=<TOKEN_SECRET>"
}Image#
With the Proxmox provider configured, we can move on to selecting the base image we want to use for our VMs.
As mentioned earlier I’m using the Debian 12 Bookworm image.
To find a newer image navigate to https://cloud.debian.org/images/cloud/.
You want the qcow2 formatted image which is compatible with Proxmox,
though you want to save it with a .img extension.
The checksum is optional,
but there’s no harm in double-checking to avoid quirky bugs due to a failed download.
# k8s-config.tf
resource "proxmox_virtual_environment_download_file" "debian_12_generic_image" {
  provider     = proxmox.euclid
  node_name    = var.euclid.node_name
  content_type = "iso"
  datastore_id = "local"

  file_name          = "debian-12-generic-amd64-20240201-1644.img"
  url                = "https://cloud.debian.org/images/cloud/bookworm/20240211-1654/debian-12-generic-amd64-20240211-1654.qcow2"
  checksum           = "b679398972ba45a60574d9202c4f97ea647dd3577e857407138b73b71a3c3c039804e40aac2f877f3969676b6c8a1ebdb4f2d67a4efa6301c21e349e37d43ef5"
  checksum_algorithm = "sha512"
}Cloud-init#
In an attempt to follow the DRY-principle we’ll take advantage of Terraform’s file templating tools. To do this we create a common cloud-init configuration which we can reuse for both our control-plane and worker nodes.
Variables#
I landed on the following variables to template the cloud-init configuration
# variables.tf
variable "vm_user" {
  description = "VM username"
  type        = string
}

variable "vm_password" {
  description = "VM password"
  type        = string
  sensitive   = true
}

variable "host_pub-key" {
  description = "Host public key"
  type        = string
}
To connect to the created VMs we need a username and a public SSH-key. On the-off chance you’ve made it this far and don’t already have an SSH-key handy, create one by running
ssh-keygen -t ed25519 -C "<EMAIL>"Using the Ed25519-algorithm is preferable, although RSA is more widely supported.
In an attempt to add an extra layer of security I’ve opted to create a password for use with sudo.
As
the cloud-init documentation
mentions, you don’t provide a clear-text password,
but a hashed version of it.
The documentation also warn that the hashed password can be easily cracked by e.g. John the Ripper,
so use this feature with caution.
If you don’t have mkpasswd available, you can run
docker run -it --rm alpine mkpasswd --method=SHA-512 <PASSWORD>to create a hashed password suitable for cloud-init.
For convenience, I’ve also added variables for the Kubernetes and Cilium CLI version.
# variables.tf
variable "k8s-version" {
  description = "Kubernetes version"
  type        = string
}

variable "cilium-cli-version" {
  description = "Cilium CLI version"
  type        = string
}
I wasn’t able to completely figure out all the moving parts when it comes to the DNS-configuration.
Though I think it has something to do with systemd-resolved
and netplan.
Looking at /etc/resolv.conf inside one of the VMs we see that it’s managed by systemd-resolved.
I theorise that systemd-resolved gets its configuration from netplan through /etc/netplan/50-cloud-init.yaml.
The configuration for netplan appears to stem form the Proxmox System > DNS settings,
which I suppose makes sense.
In itself this should be OK, but the search-entry created more headaches than I care to admit.
Running e.g. curl or ping from the VM directly works,
but trying to do the same from inside a container orchestrated by Kubernetes appends the search-domain to the query!
I’m sure this can be fixed
through CoreDNS incantations,
or some other form of wizardry,
but I found a satisfactory solution by just setting the search-domain to ".".
# variables.tf
variable "vm_dns" {
  description = "DNS config for VMs"
  type        = object({
    domain  = string
    servers = list(string)
  })
}
Example values for the above variables are
# variables.auto.tfvars
vm_dns = {
  domain  = "."
  servers = ["1.1.1.1", "8.8.8.8"]
}

vm_user      = "<USER>"
vm_password  = "<HASHED PASSWORD>"
host_pub-key = "<PUBLIC SSH KEY>"

k8s-version        = "1.29"
cilium-cli-version = "0.16.4"Templating#
Create a cloud-init/k8s-common.yaml.tftpl file and start populating it
users:
  - name: ${username}
    passwd: ${password}
    lock_passwd: false
    groups: [ adm, cdrom, dip, plugdev, lxd, sudo ]
    shell: /bin/bash
    ssh_authorized_keys:
      - ${pub-key}
#    sudo: ALL=(ALL) NOPASSWD:ALL
Here we’ve templated a user using the hashed password created earlier.
By not locking the password we can use it to run commands with sudo.
Alternatively, you can add sudo: ALL=(ALL) NOPASSWD:ALL and lock, or drop,
the password to still be able to issue sudo-commands.
Add the groups you want your user to have. For an overview of the most common groups see the Debian wiki on SystemGroups and LXD. If you want to customise the user further see the cloud-init documentation.
Next in the same k8s-common.yaml.tftpl-file we set the hostname and tell cloud-init to update and upgrade packages
during set-up. The timezone can also be set here.
hostname: ${hostname}
package_update: true
package_upgrade: true
timezone: Europe/Oslo
Next we configure IPv4 forwarding and let iptables see bridged traffic following
the Kubernetes prerequisites documentation.
In the runcmd-section we’ll run modprobe overlay and br_netfilter to apply this config.
write_files:
  - path: /etc/modules-load.d/k8s.conf
    content: |
      overlay
      br_netfilter
  - path: /etc/sysctl.d/k8s.conf
    content: |
      net.bridge.bridge-nf-call-ip6tables = 1
      net.bridge.bridge-nf-call-iptables  = 1
      net.ipv4.ip_forward                 = 1
  - path: /etc/ssh/sshd_config.d/01-harden-ssh.conf
    content: |
      PermitRootLogin no
      PasswordAuthentication no
      ChallengeResponseAuthentication no
      UsePAM no
We also add a file to harden SSH by not permitting root-login,
disallowing password authentication and all types of “keyboard-interactive” authentication,
as well as disabling Pluggable Authentication Modules (PAM).
In the packages section we add the qemu-guest-agent for better
communication between the guest and host OS.
We also need
the kubeadm dependencies,
and some tools to make debugging easier.
packages:
  - qemu-guest-agent
  - apt-transport-https
  - ca-certificates
  - curl
  - gpg
  - open-iscsi
  - net-tools
  - jq
- vimqemu-guest-agent.
In an earlier version of this article I started the agent earlier and had to use a sleep-function to wait for
kubeadm to finish.Next we tell the VM to reboot after we’ve finished setting up.
This will start any services we’ve enabled,
— like qemu-guest-agent,
which will make sure that the provider waits until everything is ready until proceeding to the next step.
power_state:
  delay: now
  mode: reboot
  message: Rebooting after cloud-init completion
  condition: true
The last part is running the appropriate commands to install kubeadm,
and configuring the systemd cgroup driver for containerd.
Conceptually this happens before the restart we configured above,
but having it at the end makes templating easier.
I’ll admit that Ansible might be better suited for this part, though in the interest of fewer moving parts I’m not using it here. If you have a working example using Ansible for this part I’d be happy to link to it here!
runcmd:
  - systemctl enable qemu-guest-agent
  - localectl set-locale LANG=en_US.UTF-8
  - curl -fsSL https://pkgs.k8s.io/core:/stable:/v${k8s-version}/deb/Release.key | gpg --dearmor -o /etc/apt/keyrings/kubernetes-apt-keyring.gpg
  - echo 'deb [signed-by=/etc/apt/keyrings/kubernetes-apt-keyring.gpg] https://pkgs.k8s.io/core:/stable:/v${k8s-version}/deb/ /' | tee /etc/apt/sources.list.d/kubernetes.list
  - apt update
  - apt install -y kubelet kubeadm kubectl
  - apt-mark hold kubelet kubeadm kubectl
  - apt install -y runc containerd
  - containerd config default | tee /etc/containerd/config.toml
  - sed -i 's/SystemdCgroup = false/SystemdCgroup = true/' /etc/containerd/config.toml
  - modprobe overlay
  - modprobe br_netfilter
  - sysctl --system
  - systemctl restart containerd
  - ${kubeadm-cmd}
At the end of the list we’ve added a template command which we’ll use to run kubeadm-commands on our different nodes.
Up until now all the snippets in the section should be in a cloud-init/k8s-common.yaml.tftpl file.
For the worker cloud-init config we can simply reuse the full template in a file
called cloud-init/k8s-worker.yaml.tftpl
#cloud-config
${common-config}
For the control-plane node we create a cloud-init/k8s-control-plane.yaml.tftpl file which adds instructions to
move the kubeconfig-file, install cilium-cli,
and the Cilium CNI.
#cloud-config
${common-config}
  - mkdir -p /home/${username}/.kube
  - cp /etc/kubernetes/admin.conf /home/${username}/.kube/config
  - chown -R ${username}:${username} /home/${username}/.kube
  - curl -sfLO https://github.com/cilium/cilium-cli/releases/download/v${cilium-cli-version}/cilium-linux-amd64.tar.gz
  - tar xzvfC cilium-linux-amd64.tar.gz /usr/local/bin
  - rm cilium-linux-amd64.tar.gz
- ${cilium-cli-cmd}Configuration#
Next we provide our cloud-init templates with values before we upload them as Snippets to Proxmox.
| |
Here we take advantage of the
built-in templatefile-function to nest template files.
For the control-plane node we run kubeadm init --skip-phases=addon/kube-proxy (line 15) to kickstart the cluster.
Cilium will be replacing the kube-proxy as seen in the cilium install --set kubeProxyReplacement=true (line 19)
command.
| |
In order to join more nodes to our cluster we need a token from a control-plane node.
We create this token from the control-plane node during the bootstrapping phase and use it in the kubeadm join command
on the worker node (line 15).
We’ll come back to this later.
Snippets#
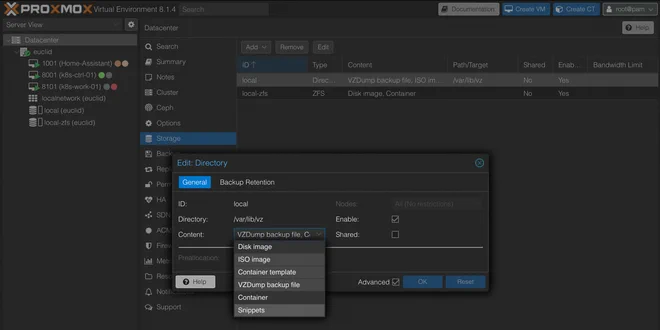
Before we can upload the cloud-init config as so-called Snippets,
we need to enable the content-type on the target datastore in Proxmox as mentioned in
the provider documentation.
To enable Snippets content, navigate to Storage under Datacenter in the Proxmox VE web interface. Double-click an appropriate row and add Snippets in the Content drop-down menu.
Virtual Machines#
Now that we’ve got an OS image and the cloud-init configuration ready, it’s time to configure the VMs. As a proof of concept we’re going to create a single control-plane node and join a lonely worker node.
If you want to simplify the deployment even further you can allow regular workloads on the control-plane node,
thus only needing one node for your Kubernetes “cluster”.
This can be done by removing the control-plane taint by running
kubectl taint nodes --all node-role.kubernetes.io/control-plane-with the kubeconfig file for the single control-plane node.
The Proxmox VE wiki is a great resource for details on VM configuration. To help navigate all the levers and dials, the provider we’ve chosen fortunately has documentation on how to get started.
Controller Plane Node#
I’ll try to explain the options I’ve selected, though if you disagree or know of a better way I’m all ears.
The first interesting configuration is the machine-type on line 11.
Setting this to Q35 provides a virtual PCIe bus which allows us to pass through PCIe devices.
Next change is the scsi_hardware on line 12.
The provider default is virtio-scsi-pci,
but changing this to virtio-scsi-single
— which is also the Proxmox default,
enables IO threads and should
give increased performance.
Since we plan to pass through PCIe we should to change the BIOS type from SeaBIOS to OVMF (line 13). This means we must also create an EFI disk (line 29).
We’ve changed the CPU type to host for maximum
performance (line 17).
If you plan to migrate your VMs between machines with differing CPUs you should probably set this to x86-64-v2-AES.
When it comes to disk I’ve opted for cache writethrough (line 39) balancing safety and read performance according to
the documentation.
| |
On line 46 we enable the QEMU guest agent functionality manually.
To get better VM optimisation we can set the OS-type to l26 (line 52) for OSes using a Linux kernel version above 2.6.
In the initialisation-phase we’re explicitly setting the DNS-servers and search-domain (line 57–58) to circumvent the DNS issues mentioned in the Cloud-init section.
The IP-config (line 62–63) should probably also have been variables, but this works. Make sure to not use a conflicting IP.
At the very end we input the Cloud-init configuration we crafted earlier (line 68).
After the VM is created and the qemu-guest-agent service reports an IP we can grab it,
output "ctrl_01_ipv4_address" {
depends_on = [proxmox_virtual_environment_vm.k8s-ctrl-01]
value = proxmox_virtual_environment_vm.k8s-ctrl-01.ipv4_addresses[1][0]
}and store it in a file.
resource "local_file" "ctrl-01-ip" {
content = proxmox_virtual_environment_vm.k8s-ctrl-01.ipv4_addresses[1][0]
filename = "output/ctrl-01-ip.txt"
file_permission = "0644"
}This means that kubeadm has finished performing its magic,
and we can use Inviction Labs’ shell-resource to
grab the kubeconfig-file
module "kube-config" {
depends_on = [module.sleep]
source = "Invicton-Labs/shell-resource/external"
version = "0.4.1"
command_unix = "ssh -o StrictHostKeyChecking=no ${var.vm_user}@${local_file.ctrl-01-ip.content} cat /home/${var.vm_user}/.kube/config"
}We then store the output of this command in a local file
resource "local_file" "kube-config" {
content = module.kube-config.stdout
filename = "output/config"
file_permission = "0600"
}Note that we’re using
the -o StrictHostKeyChecking=no
flag for ssh here which is generally not recommended.
Since we’re already committing crimes against security best practices,
we grab the kubeadm join token for the worker node in a similar fashion
module "kubeadm-join" {
depends_on = [local_file.kube-config]
source = "Invicton-Labs/shell-resource/external"
version = "0.4.1"
command_unix = "ssh -o StrictHostKeyChecking=no ${var.vm_user}@${local_file.ctrl-01-ip.content} /usr/bin/kubeadm token create --print-join-command"
}I am by no means happy with this process and would be grateful for any suggestions for improvements.
Worker Node#
The configuration of the worker node is fairly similar to that of the control plane node, with the expection of more RAM (line 21) and a mounted PCIe device (line 71).
| |
In order to get the hostpci setting to work with the provider we first need to create a mapping.
Navigate to Resource Mappings under Datacenter in the Proxmox VE web interface,
then click Add under PCI Devices.
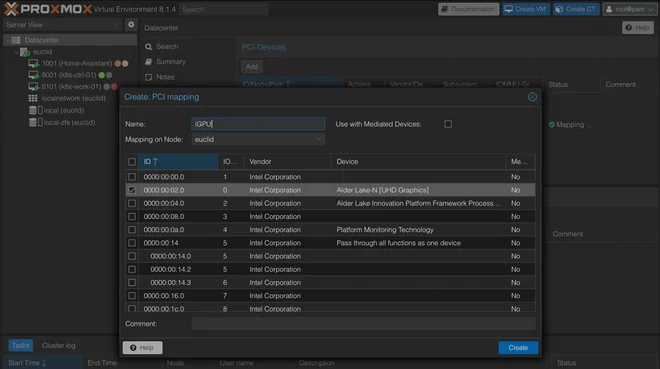

Here we’ve added the N100 iGPU for use in e.g. QuickSync hardware video decoding on the worker node.
Lastly we output the IP of the worker node to a file as well
output "work_01_ipv4_address" {
depends_on = [proxmox_virtual_environment_vm.k8s-work-01]
value = proxmox_virtual_environment_vm.k8s-work-01.ipv4_addresses[1][0]
}
resource "local_file" "work-01-ip" {
content = proxmox_virtual_environment_vm.k8s-work-01.ipv4_addresses[1][0]
filename = "output/work-01-ip.txt"
file_permission = "0644"
}Kubernetes#
Assuming you’ve successfully ran
tofu applyyou should now have a working Kubernetes cluster with Cilium 🎉
To double-check that everything works you can run
kubectl --kubeconfig output/config get po -A -o widefrom your local machine to check the status of all pods on the cluster you just created.
If everything went OK you should now see something similar to
NAMESPACE NAME READY STATUS RESTARTS AGE IP NODE NOMINATED NODE READINESS GATES
kube-system cilium-operator-577fd997b-sln7f 1/1 Running 0 9m 192.168.1.110 k8s-work-01 <none> <none>
kube-system cilium-t8tgg 1/1 Running 0 9m 192.168.1.110 k8s-work-01 <none> <none>
kube-system cilium-zthd4 1/1 Running 0 9m 192.168.1.100 k8s-ctrl-01 <none> <none>
kube-system coredns-76f75df574-8rqc4 1/1 Running 0 10m 10.0.0.83 k8s-ctrl-01 <none> <none>
kube-system coredns-76f75df574-ct4ml 1/1 Running 0 10m 10.0.0.213 k8s-ctrl-01 <none> <none>
kube-system etcd-k8s-ctrl-01 1/1 Running 0 10m 192.168.1.100 k8s-ctrl-01 <none> <none>
kube-system kube-apiserver-k8s-ctrl-01 1/1 Running 0 10m 192.168.1.100 k8s-ctrl-01 <none> <none>
kube-system kube-controller-manager-k8s-ctrl-01 1/1 Running 0 10m 192.168.1.100 k8s-ctrl-01 <none> <none>
kube-system kube-scheduler-k8s-ctrl-01 1/1 Running 0 10m 192.168.1.100 k8s-ctrl-01 <none> <none>with pods running on both k8s-ctrl-01 and k8s-work-01.
For inspiration on what to do next you can check out my “mini-kubernetes” GitLab repo, or my bigger homelab repo over at GitHub. Both use an Argo CD with Kustomize + Helm approach for declarative GitOps configuration.
Troubleshooting#
There’s a lot of moving parts in this set up, something that makes troubleshooting difficult.
Most errors I encountered during this approach could be resolved by running
tofu applya second time.
If Kubernetes fails it could be the Cilium config, in which case running
cilium statusmight help you troubleshoot your problems.
In this set up I found I didn’t have to manually disable swap, but if you experience problems it might be an idea to check if it’s disabled by running
free -mand check if swap returns 0.
Disable swap for the kubelet to work properly run
sudo swapoff -aand comment out swap in /etc/fstab to disable it on boot
sudo sed -e '/swap/ s/^#*/#/' -i /etc/fstabConnection to different machines with the same IP will make ssh warn you about a
potential man-in-the-middle attack.
As long as you’re on you local network this is probably safe and you can remove the offend IPs
from the ~/.ssh/known_hosts file.
Summary#
You can find these files in the GitLab repo hosting the files for this article.
Folder structure
❯ tree
.
├── cloud-init
│ ├── k8s-common.yaml.tftpl
│ ├── k8s-control-plane.yaml.tftpl
│ └── k8s-worker.yaml.tftpl
├── k8s-config.tf
├── k8s-vm-control-plane.tf
├── k8s-vm-worker.tf
├── main.tf
├── variables.auto.tfvars
└── variables.tfMain file with the provider configuration
# main.tf
terraform {
required_providers {
proxmox = {
source = "bpg/proxmox"
version = "0.50.0"
}
}
}
provider "proxmox" {
alias = "euclid"
endpoint = var.euclid.endpoint
insecure = var.euclid.insecure
api_token = var.euclid_auth.api_token
ssh {
agent = true
username = var.euclid_auth.username
}
tmp_dir = "/var/tmp"
}All defined variables
# variables.tf
variable "euclid" {
description = "Proxmox server configuration for Euclid"
type = object({
node_name = string
endpoint = string
insecure = bool
})
}
variable "euclid_auth" {
description = "Euclid Proxmox server auth"
type = object({
username = string
api_token = string
})
sensitive = true
}
variable "vm_dns" {
description = "DNS config for VMs"
type = object({
domain = string
servers = list(string)
})
}
variable "vm_user" {
description = "VM username"
type = string
}
variable "vm_password" {
description = "VM password"
type = string
sensitive = true
}
variable "host_pub-key" {
description = "Host public key"
type = string
}
variable "k8s-version" {
description = "Kubernetes version"
type = string
}
variable "cilium-cli-version" {
description = "Cilium CLI version"
type = string
}Values for all variables
# variables.auto.tfvars
euclid = {
node_name = "euclid"
endpoint = "https://192.168.1.42:8006"
insecure = true
}
euclid_auth = {
username = "root"
api_token = "root@pam!<TOKEN_NAME>=<TOKEN_SECRET>"
}
vm_dns = {
domain = "."
servers = ["1.1.1.1", "8.8.8.8"]
}
vm_user = "<USER>"
vm_password = "<HASHED PASSWORD>"
host_pub-key = "<PUBLIC SSH KEY>"
k8s-version = "1.29"
cilium-cli-version = "0.16.4"Common configuration
# k8s-config.tf
resource "proxmox_virtual_environment_download_file" "debian_12_generic_image" {
provider = proxmox.euclid
node_name = var.euclid.node_name
content_type = "iso"
datastore_id = "local"
file_name = "debian-12-generic-amd64-20240201-1644.img"
url = "https://cloud.debian.org/images/cloud/bookworm/20240211-1654/debian-12-generic-amd64-20240211-1654.qcow2"
checksum = "b679398972ba45a60574d9202c4f97ea647dd3577e857407138b73b71a3c3c039804e40aac2f877f3969676b6c8a1ebdb4f2d67a4efa6301c21e349e37d43ef5"
checksum_algorithm = "sha512"
}
# Make sure the "Snippets" content type is enabled on the target datastore in Proxmox before applying the configuration below.
# https://github.com/bpg/terraform-provider-proxmox/blob/main/docs/guides/cloud-init.md
resource "proxmox_virtual_environment_file" "cloud-init-ctrl-01" {
  provider     = proxmox.euclid
  node_name    = var.euclid.node_name
  content_type = "snippets"
  datastore_id = "local"

  source_raw {
    data = templatefile("./cloud-init/k8s-control-plane.yaml.tftpl", {
      common-config = templatefile("./cloud-init/k8s-common.yaml.tftpl", {
        hostname    = "k8s-ctrl-01"
        username    = var.vm_user
        password    = var.vm_password
        pub-key     = var.host_pub-key
        k8s-version = var.k8s-version
        kubeadm-cmd = "kubeadm init --skip-phases=addon/kube-proxy"
      })
      username           = var.vm_user
      cilium-cli-version = var.cilium-cli-version
      cilium-cli-cmd     = "HOME=/home/${var.vm_user} KUBECONFIG=/etc/kubernetes/admin.conf cilium install --set kubeProxyReplacement=true"
    })
    file_name = "cloud-init-k8s-ctrl-01.yaml"
  }
}
resource "proxmox_virtual_environment_file" "cloud-init-work-01" {
  provider     = proxmox.euclid
  node_name    = var.euclid.node_name
  content_type = "snippets"
  datastore_id = "local"

  source_raw {
    data = templatefile("./cloud-init/k8s-worker.yaml.tftpl", {
      common-config = templatefile("./cloud-init/k8s-common.yaml.tftpl", {
        hostname    = "k8s-work-01"
        username    = var.vm_user
        password    = var.vm_password
        pub-key     = var.host_pub-key
        k8s-version = var.k8s-version
        kubeadm-cmd = module.kubeadm-join.stdout
      })
    })
    file_name = "cloud-init-k8s-work-01.yaml"
  }
}Common cloud-init configuration
users:
- name: ${username}
passwd: ${password}
lock_passwd: false
groups: [ adm, cdrom, dip, plugdev, lxd, sudo ]
shell: /bin/bash
ssh_authorized_keys:
- ${pub-key}
#sudo: ALL=(ALL) NOPASSWD:ALL
hostname: ${hostname}
package_update: true
package_upgrade: true
timezone: Europe/Oslo
write_files:
- path: /etc/modules-load.d/k8s.conf
content: |
overlay
br_netfilter
- path: /etc/sysctl.d/k8s.conf
content: |
net.bridge.bridge-nf-call-ip6tables = 1
net.bridge.bridge-nf-call-iptables = 1
net.ipv4.ip_forward = 1
- path: /etc/ssh/sshd_config.d/01-harden-ssh.conf
content: |
PermitRootLogin no
PasswordAuthentication no
ChallengeResponseAuthentication no
UsePAM no
packages:
- qemu-guest-agent
- net-tools
- vim
- apt-transport-https
- ca-certificates
- curl
- gpg
- open-iscsi
- jq
power_state:
delay: now
mode: reboot
message: Rebooting after cloud-init completion
condition: true
runcmd:
- systemctl enable qemu-guest-agent
- localectl set-locale LANG=en_US.UTF-8
- curl -fsSL https://pkgs.k8s.io/core:/stable:/v${k8s-version}/deb/Release.key | gpg --dearmor -o /etc/apt/keyrings/kubernetes-apt-keyring.gpg
- echo 'deb [signed-by=/etc/apt/keyrings/kubernetes-apt-keyring.gpg] https://pkgs.k8s.io/core:/stable:/v${k8s-version}/deb/ /' | tee /etc/apt/sources.list.d/kubernetes.list
- apt update
- apt install -y kubelet kubeadm kubectl
- apt-mark hold kubelet kubeadm kubectl
- apt install -y runc containerd
- containerd config default | tee /etc/containerd/config.toml
- sed -i 's/SystemdCgroup = false/SystemdCgroup = true/' /etc/containerd/config.toml
- modprobe overlay
- modprobe br_netfilter
- sysctl --system
- systemctl restart containerd
- ${kubeadm-cmd}Cloud-init configuration for control plane node
#cloud-config
${common-config}
- mkdir -p /home/${username}/.kube
- cp /etc/kubernetes/admin.conf /home/${username}/.kube/config
- chown -R ${username}:${username} /home/${username}/.kube
- curl -sfLO https://github.com/cilium/cilium-cli/releases/download/v${cilium-cli-version}/cilium-linux-amd64.tar.gz
- tar xzvfC cilium-linux-amd64.tar.gz /usr/local/bin
- rm cilium-linux-amd64.tar.gz
- ${cilium-cli-cmd}Cloud-init configuration for worker node
#cloud-config
${common-config}VM configuration for control plane node
# k8s-vm-control-plane.tf
resource "proxmox_virtual_environment_vm" "k8s-ctrl-01" {
  provider  = proxmox.euclid
  node_name = var.euclid.node_name

  name        = "k8s-ctrl-01"
  description = "Kubernetes Control Plane 01"
  tags        = ["k8s", "control-plane"]
  on_boot     = true
  vm_id       = 8001

  machine       = "q35"
  scsi_hardware = "virtio-scsi-single"
  bios          = "ovmf"

  cpu {
    cores = 4
    type  = "host"
  }

  memory {
    dedicated = 4096
  }

  network_device {
    bridge      = "vmbr0"
    mac_address = "BC:24:11:2E:C0:01"
  }

  efi_disk {
    datastore_id = "local-zfs"
    file_format  = "raw" // To support qcow2 format
    type         = "4m"
  }

  disk {
    datastore_id = "local-zfs"
    file_id      = proxmox_virtual_environment_download_file.debian_12_generic_image.id
    interface    = "scsi0"
    cache        = "writethrough"
    discard      = "on"
    ssd          = true
    size         = 32
  }

  boot_order = ["scsi0"]

  agent {
    enabled = true
  }

  operating_system {
    type = "l26" # Linux Kernel 2.6 - 6.X.
  }

  initialization {
    dns {
      domain  = var.vm_dns.domain
      servers = var.vm_dns.servers
    }
    ip_config {
      ipv4 {
        address = "192.168.1.100/24"
        gateway = "192.168.1.1"
      }
    }

    datastore_id      = "local-zfs"
    user_data_file_id = proxmox_virtual_environment_file.cloud-init-ctrl-01.id
  }
}
output "ctrl_01_ipv4_address" {
  depends_on = [proxmox_virtual_environment_vm.k8s-ctrl-01]
  value      = proxmox_virtual_environment_vm.k8s-ctrl-01.ipv4_addresses[1][0]
}
resource "local_file" "ctrl-01-ip" {
  content         = proxmox_virtual_environment_vm.k8s-ctrl-01.ipv4_addresses[1][0]
  filename        = "output/ctrl-01-ip.txt"
  file_permission = "0644"
}
module "kube-config" {
depends_on = [local_file.ctrl-01-ip]
source = "Invicton-Labs/shell-resource/external"
version = "0.4.1"
command_unix = "ssh -o StrictHostKeyChecking=no ${var.vm_user}@${local_file.ctrl-01-ip.content} cat /home/${var.vm_user}/.kube/config"
}
resource "local_file" "kube-config" {
  content         = module.kube-config.stdout
  filename        = "output/config"
  file_permission = "0600"
}
module "kubeadm-join" {
  depends_on   = [local_file.kube-config]
  source       = "Invicton-Labs/shell-resource/external"
  version      = "0.4.1"
  command_unix = "ssh -o StrictHostKeyChecking=no ${var.vm_user}@${local_file.ctrl-01-ip.content} /usr/bin/kubeadm token create --print-join-command"
}VM configuration for worker node
# k8s-vm-worker.tf
resource "proxmox_virtual_environment_vm" "k8s-work-01" {
  provider  = proxmox.euclid
  node_name = var.euclid.node_name

  name        = "k8s-work-01"
  description = "Kubernetes Worker 01"
  tags        = ["k8s", "worker"]
  on_boot     = true
  vm_id       = 8101

  machine       = "q35"
  scsi_hardware = "virtio-scsi-single"
  bios          = "ovmf"

  cpu {
    cores = 4
    type  = "host"
  }

  memory {
    dedicated = 8192
  }

  network_device {
    bridge      = "vmbr0"
    mac_address = "BC:24:11:2E:AE:01"
  }

  efi_disk {
    datastore_id = "local-zfs"
    file_format  = "raw" // To support qcow2 format
    type         = "4m"
  }

  disk {
    datastore_id = "local-zfs"
    file_id      = proxmox_virtual_environment_download_file.debian_12_generic_image.id
    interface    = "scsi0"
    cache        = "writethrough"
    discard      = "on"
    ssd          = true
    size         = 32
  }

  boot_order = ["scsi0"]

  agent {
    enabled = true
  }

  operating_system {
    type = "l26" # Linux Kernel 2.6 - 6.X.
  }

  initialization {
    dns {
      domain  = var.vm_dns.domain
      servers = var.vm_dns.servers
    }
    ip_config {
      ipv4 {
        address = "192.168.1.110/24"
        gateway = "192.168.1.1"
      }
    }

    datastore_id      = "local-zfs"
    user_data_file_id = proxmox_virtual_environment_file.cloud-init-work-01.id
  }

  hostpci {
    # Passthrough iGPU
    device  = "hostpci0"
    #id     = "0000:00:02"
    mapping = "iGPU"
    pcie    = true
    rombar  = true
    xvga    = false
  }
}
output "work_01_ipv4_address" {
  depends_on = [proxmox_virtual_environment_vm.k8s-work-01]
  value      = proxmox_virtual_environment_vm.k8s-work-01.ipv4_addresses[1][0]
}

resource "local_file" "work-01-ip" {
  content         = proxmox_virtual_environment_vm.k8s-work-01.ipv4_addresses[1][0]
  filename        = "output/work-01-ip.txt"
  file_permission = "0644"
}