

Taking advantage of hardware acceleration can drastically reduce both CPU and power usage when playing video, enabling seemingly innocuous chips — like the Intel N100, to render multiple 4K video streams.
In this article we’ll go through how to enable Intel® Quick Sync Video for hardware accelerated transcoding in containers orchestrated by Kubernetes. As an example we’ll use both Jellyfin and Plex, though it should work similar for other media server solutions like Emby and Universal Media Server.
Other — arguably more lightweight, containerised solutions also exists using e.g. LXC as described by Cipher Menial in their Configure GPU Passthrough to LXD Container article.
Background#
This article is written using aCWWK mini-PC with an Intel i3-N305 CPU, though just about any newer non-F Intel CPU should work. If in doubt that your CPU comes with an integrated GPU, you can check a list of Quick Sync Video support here.
I’m running Proxmox VE 8.2 as a hypervisor. This extra abstraction layer makes experimenting easier, but also adds complexity as you need to pass through the iGPU to a virtual machine. I’ve tried to summarise how to do this in an earlier article.
I opted to go for a Debian 12 Bookworm backports image1, due to reports on Reddit2 of support on hardware transcoding for newer Intel CPUs requiring Linux kernel version 6.2 or newer — along with changes to the 6.8 version reportedly3 breaking hardware transcoding. The image I chose ships with Linux kernel 6.6 and appears to work. A bare-metal installation of Debian 12 with backports enabled and a newer kernel should work similar.
Overview#
This article will assume you already have a working Kubernetes cluster.
If you don’t
— and have too much spare time would like to try your hands at Kubernetes,
I’ve written articles
on Bootstrapping k3s with Cilium,
and
— if you have way too much spare time,
running Kubernetes on Proxmox.
We’ll start by installing the required packages on the Kubernetes host OS before deploying the required operators to get hardware acceleration with Quick Sync to work in our containers.
Next we take a look at manually mapping the iGPU-device into the container and explore the required Security Context to utilise the GPU.
Before wrapping up the article, we take a look at hardening pods by limiting privileges.
If you’re not one for details and diatribe you can skip to the Summary section for a quick guide on how to get Quick Sync to work in Kubernetes.
Prerequisites#
Before we try to get Quick Sync to work with containers we should make sure that everything works as expected on the Kubernetes host machine.
Firmware for
Intel’s integrated GPUs
is available in the non-free-firmware repository of Debian in
the firmware-misc-nonfree package.
To enable VA-API you probably also want to grab the
intel-media-va-driver-non-free package from
the non-free repository.
You should also install the intel-gpu-tools package from the main repository.
If you haven’t already added the non-free and non-free-firmware sources
(check the Components: line in the /etc/apt/sources.list.d/debian.sources),
you can add them by running
sudo sed -i '/Components/s/$/ non-free non-free-firmware/' /etc/apt/sources.list.d/debian.sourcesThe debian.sources file should now look similar to
Types: deb deb-src
URIs: mirror+file:///etc/apt/mirrors/debian.list
Suites: bookworm bookworm-updates bookworm-backports
Components: main non-free non-free-firmware

Types: deb deb-src
URIs: mirror+file:///etc/apt/mirrors/debian-security.list
Suites: bookworm-security
Components: main non-free non-free-firmware
Next update your local apt repository and install the packages
sudo apt update
sudo apt install firmware-misc-nonfree intel-media-va-driver-non-free intel-gpu-tools
With the new firmware installed, reboot the machine and run
sudo intel_gpu_topIf everything works you should now see GPU usage
intel-gpu-top: Intel Alderlake_n (Gen12) @ /dev/dri/card1      0/   0 MHz
         ENGINES     BUSY                         MI_SEMA MI_WAIT
       Render/3D    0.00% |                             |      0%      0%
         Blitter    0.00% |                             |      0%      0%
           Video    0.00% |                             |      0%      0%
    VideoEnhance    0.00% |                             |      0%      0%
If you’re instead met with
intel_gpu_top: ../tools/intel_gpu_top.c:1932: init_engine_classes: Assertion `max >= 0' failed.
Aborted
something is obviously wrong. It possibly means you need to update your Linux kernel. To check you current kernel version run
uname -aAccording to the reports mentioned in the Background2 section this should be version 6.2 or newer. Check for available kernel versions by running
apt-cache search linux-imageand pick a suitable kernel which can be installed by running e.g.
sudo apt install linux-image-6.6.13+bpo-amd64At the time of writing there’s reports3 of the 6.8 kernel having trouble with hardware decoding, so you might want to avoid that.
For more details on upgrading your kernel, take a look at the Debian wiki.
There’s also custom kernels like Liquorix or XanMod — or you could try to compile you own kernel.
Node Feature Discovery (optional)#
In the readme for installing the Intel Device Plugins Operator Helm Chart, Node Feature Discovery (NFD) is mentioned as an optional dependency. It should be possible to label your nodes manually, but I found it easier to run NFD instead of trying to figure out which labels are needed.
To install and configure NFD we can apply the following Kustomization file
| |
Line 7 fetches the default NFD v0.15.4 installation from GitHub. Intel provides Node Feature Rules for their hardware which we fetch on line 9 from their intel-device-plugins-for-kubernetes repository.
To configure the NFD components we can use ConfigMaps.
Using
the configMapGenerator
provided by Kustomize,
we can configure the NFD worker to only run on startup.
This is done by configuring a non-positive sleep interval, e.g. 0
| |
For more information about configuration parameters take a look at the NFD sigs documentation.
Apply the above kustomization and check that the node labels have been updated by running
kubectl get node -o 'jsonpath={.items[*].metadata.labels}' | jqIf everything went well you should now see an "intel.feature.node.kubernetes.io/gpu": "true" label on your nodes with
an Intel GPU.
Since we’ve edited the NFD-worker config to only run once on startup,
make sure you run the NFD-worker after the Intel NFD rules have been applied,
or edit the configuration to run on an interval.
Kubernetes Device Plugins#
Intel has divided their support for the Kubernetes Device Plugins framework into a general operator and several plugins.
With the nodes correctly labelled we can now install the Intel Device Plugin for Kubernetes.
Cert-manager#
The Intel Device Plugins Operator has a hard requirement on Cert-manager.
Cert-manager helps you create and manage TLS-certificates for workloads in Kubernetes. If you’re interested in learning more, I’ve written about how you can use Cert-manager to create Wildcard Certificates with Traefik.
Cert-manager can easily be installed by running
kubectl apply -f https://github.com/cert-manager/cert-manager/releases/download/v1.14.5/cert-manager.yamlor as a Helm Chart as shown in the Summary section.
Intel Device Plugins Operator#
With the proper requirements in place, the Intel Device Plugins Operator is can be installed as a Helm chart.
Here we’ve taken advantage of the Kustomize built-in Helm Chart Inflation Generator instead of installing it directly with Helm.
| |
After creating the intel-device-plugins namespace, run
kubectl kustomize --enable-helm intel-device-plugins/operator | kubectl apply -f -to install the operator.
Intel GPU Plugin#
Once the Intel Device Plugins Operator is in place we can add Intel Device Plugins. In our case we’re only interested in the GPU plugin, though Intel provides plugins for a plethora of their other hardware devices, including FPGAs and other specialised hardware like the Intel In-Memory Analytics Acceleration.
We can configure the GPU plugin to allow multiple pods to share the same GPU resource, here we’ve configured for up to five workloads to share each iGPU (line 3). Since we’ve already applied the Intel NFD rules in a previous section we don’t need to add them again (line 4). We’ve also configured the plugin to only run on nodes with an Intel GPU as labelled by NFD (line 6). For more configuration values take a look at the chart’s values.yaml file.
| |
There’s experimental support for GPU Aware Scheduling, though it’s only used for scheduling workloads to nodes, not limiting usage. A container requesting 10% can still use 100% of the GPU.
To install the GPU plugin without NFD follow the
guide here,
or possibly relax the nodeSelector criteria in the Helm chart values.
Using the above values we can again create a Kustomize file using the Helm chart inflation generator
| |
and apply it
kubectl kustomize --enable-helm intel-device-plugins/operator | kubectl apply -f -If you prefer you can of course just use Helm directly as well.
Verify that the plugin is installed correctly by running
kubectl get node -o 'jsonpath={.items[*].status.allocatable}' | jq which should display
{
...
"gpu.intel.com/i915": "5",
...
}You can also try to run a sample workload as described in the Intel GPU plugin documentation.
Allocating GPU resources to a workload#
Allocating GPU resources to a workload is as simple as setting a resource limit for the correct resource,
e.g. gpu.intel.com/i915: 1000m,
similar to how you would limit CPU, memory,
and NVIDIA GPU resources.
Plex#
A minimal deployment of Plex using the official image from DockerHub with Intel GPU acceleration looks like
| |
A more detailed Deployment with a both a host and an NFS mount, including an attached Service and Ingress can be found in this article’s GitLab repository here.
To make sure hardware transcoding works with Plex you can try to play some of the media you’ve added to your library.
If the media is encoded in a supported format we will get a direct stream — which is better than transcoding. We can check this in the Plex Dashboard while playing media.

To force transcoding we can select a lower quality.

You should now see (hw) in the transcode information if everything works.
If you don’t see (hw) in the transcode information it means that you’re using software transcoding.
A possible remedy is to make sure you have the required firmware installed.
As a last resort disable HDR tone mapping in the transcode settings.
We can also verify that hardware transcoding is taking place by running
sudo intel_gpu_topon the host machine to see if the Intel GPU is being utilised.
Jellyfin#
Jellyfin is completely free, and therefore require no payment to enable hardware transcoding.
A Jellyfin deployment is pretty similar to a Plex one, only changing the image and corresponding names/labels. A complete deployment of Jellyfin can be found in this article’s GitLab repository here.
Arguably, Jellyfin has better support for transcoding than Plex — Jellyfin at least has a lot more levers you can pull. To know which levers you safely can pull, Wikipedia has an informative table detailing which formats a given CPU generation supports. E.g. the Alder Lake (12th gen) i3-N305 I’m running on doesn’t support AV1 encoding, but does support HEVC encoding. This means playback crashes if I try to allow encoding in AV1 format, but allowing encoding in HEVC format works.
Trying to stream a 4K HDR HEVC encoded video works flawlessly without the need for any transcoding. To get Jellyfin to transcode we can try downsampling the video again
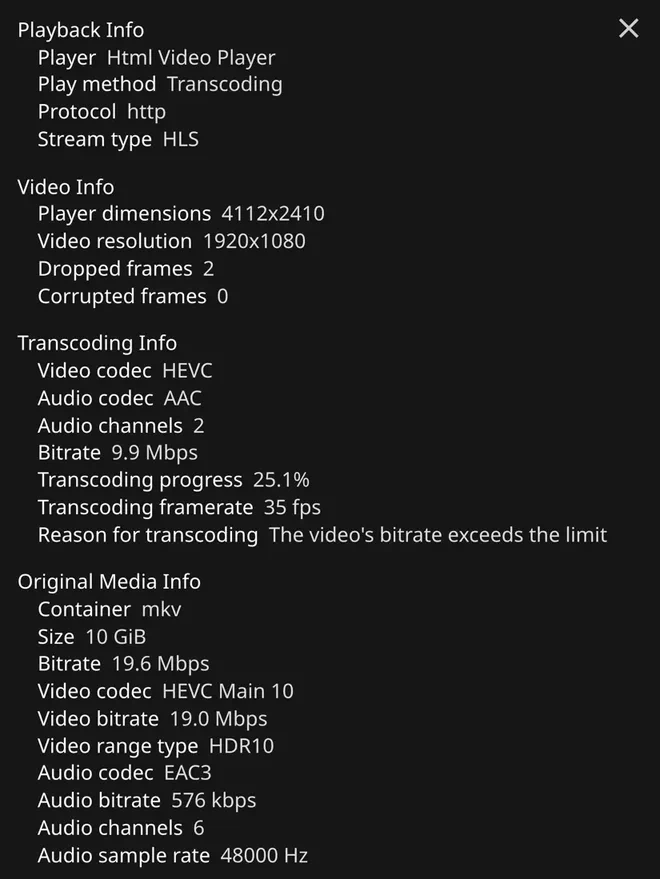
Checking the playback info in Jellyfin,
we unfortunately don’t see any explicit indication of hardware transcoding taking place,
though running intel_gpu_top we see that it in fact is.
intel-gpu-top: Intel Alderlake_n (Gen12) @ /dev/dri/card1 - 213/ 909 MHz
ENGINES BUSY MI_SEMA MI_WAIT
Render/3D 55.49% |████████████████▏ | 0% 0%
Blitter 0.00% | | 0% 0%
Video 99.19% |████████████████████████████▉| 0% 0%
VideoEnhance 0.00% | | 0% 0%
PID NAME Render/3D Blitter Video VideoEnhance
46994 ffmpeg |█████▉ || ||██████████|| |Manually mapping the GPU#
An imho less elegant way of getting hardware transcoding to work is mounting the iGPU device directly into the container as show on line 19–20 and 22–24.
| |
Mapping the iGPU device into the container will make it appear as a transcoding device, but you still need the required privileges to actually use it. If you’re a brute that don’t need no security you can simply change the Security Context of the container to privileged (line 17). This can potentially give processes in the container root access to the host machine (this is bad!), but at least you’ll be able to play your hardware accelerated videos while you scoff about those silly hackers!
I tried removing the privilege and instead adding the iGPU groups (line 14, below) as reported by the host by running
ls -ln /dev/driwhich shows
crw-rw---- 1 0 44 226, 0 May 29 17:27 card0
crw-rw---- 1 0 44 226, 1 May 29 17:27 card1
crw-rw---- 1 0 104 226, 128 May 29 17:27 renderD128 | |
I unfortunately couldn’t get this to work.
Though I wouldn’t recommend mounting the GPU directly, I’d love to hear from you if you’ve gotten this to work without giving the container root privileges.
Hardening#
Running containers that you might potentially expose to the internet is risky business. You should therefore only run them with the minimum privileges they require to function.
Taking inspiration from onedr0p’s collection of container images and his home-ops Plex configuration — as well as getting some help from the man himself over at the Home Operations Discord, I was able to craft the following hardened deployment for Plex
| |
Here we’re using onedr0p’s Plex image (line 22) which
by default
runs as user 65534 (nobody) with group 65534 (nogroup).
We’ve copied this to the security context on line 14-16,
but the id could in principle be any positive number.
We also make sure the pod is not running as 0 (root) by adding line 16.
On line 18 we add groups 44 (video) and 104 (render) found by running
ls -ln /dev/drito check which groups the Intel GPU device belongs to.
As a sidenote, I was able to hardware transcode using only 104 (render) as a supplemental group,
but I don’t see much harm in including 44 (video) in case it’s needed for something I didn’t test for.
To further harden the pod we can enforce the RuntimeDefault secure computing mode as done on line 20.
Next we move on to harden the Plex container itself by explicitly disallowing privilege escalation (line 25) and dropping all Linux capabilities on line 27.
We also set the root filesystem to read only on line 28.
Due to a read only root filesystem and the default transcode directory being /transcode,
we have to create an emptyDir volume (line 38-39) and
mount it under /transcode (line 34) to avoid playback errors with the transcoder failing to start due to a missing
write permission.
For potential further hardening you can take a look at AppArmor profiles and SELinux labels as well.
Similar hardening should also work with Jellyfin.
Summary#
Before configuring your Kubernetes cluster you have to prepare the host kernel for GPU transcoding to work. A Linux kernel version 6.2 or newer is required for newer Intel CPUs. For Debian based systems, you can run the following to enable non-free sources with the required packages and install them
sudo sed -i '/Components/s/$/ non-free non-free-firmware/' /etc/apt/sources.list.d/debian.sources
sudo apt update
sudo apt install -y firmware-misc-nonfree intel-media-va-driver-non-free intel-gpu-toolsFor configuring Kubernetes all the required resources can be found in this GitLab repo. The configuration are written for use by Argo CD with Kustomize + Helm, but should be easily adaptable for other approaches using e.g. Flux CD.
❯ tree
.
├── cert-manager
│ ├── kustomization.yaml
│ └── ns.yaml
├── intel-device-plugins
│ ├── gpu
│ │ ├── kustomization.yaml
│ │ └── values.yaml
│ ├── kustomization.yaml
│ ├── ns.yaml
│ └── operator
│ └── kustomization.yaml
├── jellyfin
│ ├── deployment.yaml
│ ├── ingress.yaml
│ ├── kustomization.yaml
│ ├── ns.yaml
│ ├── pv-jellyfin-config.yaml
│ ├── pvc-jellyfin-config.yaml
│ └── svc.yaml
├── nfd
│ ├── kustomization.yaml
│ └── nfd-worker.conf
├── plex
│ ├── deployment.yaml
│ ├── ingress.yaml
│ ├── kustomization.yaml
│ ├── ns.yaml
│ └── svc.yaml
├── plex-hardened.yaml
├── plex-minimal-gpu.yaml
├── plex-privileged.yaml
└── plex-supplemental-groups.yamlNode Feature Discovery#
# nfd/kustomization.yaml
apiVersion: kustomize.config.k8s.io/v1beta1
kind: Kustomization

resources:
  # Node Feature Discovery
  - https://github.com/kubernetes-sigs/node-feature-discovery/deployment/overlays/default?ref=v0.15.4
  # NFD rules for Intel HW
  - https://github.com/intel/intel-device-plugins-for-kubernetes/deployments/nfd/overlays/node-feature-rules?ref=v0.29.0

configMapGenerator:
  - name: nfd-worker-conf
    behavior: replace
    files:
- nfd-worker.conf# nfd/nfd-worker.conf
core:
sleepInterval: 0sCert-manager#
# cert-manager/kustomization.yaml
apiVersion: kustomize.config.k8s.io/v1beta1
kind: Kustomization

resources:
  - ns.yaml

helmCharts:
  - name: cert-manager
    repo: https://charts.jetstack.io
    version: 1.14.5
    includeCRDs: true
    releaseName: cert-manager
    namespace: cert-manager
    valuesInline:
      installCRDs: true
# cert-manager/ns.yaml
apiVersion: v1
kind: Namespace
metadata:
name: cert-managerIntel Device Plugins#
# intel-device-plugins/kustomization.yaml
apiVersion: kustomize.config.k8s.io/v1beta1
kind: Kustomization

resources:
  - ns.yaml
  - operator
  - gpu
# intel-device-plugins/ns.yaml
apiVersion: v1
kind: Namespace
metadata:
name: intel-device-plugins# intel-device-plugins/operator/kustomization.yaml
apiVersion: kustomize.config.k8s.io/v1beta1
kind: Kustomization
helmCharts:
- name: intel-device-plugins-operator
repo: https://intel.github.io/helm-charts/
version: 0.30.0
namespace: intel-device-plugins
releaseName: intel-device-plugins-operator
includeCRDs: true# intel-device-plugins/gpu/kustomization.yaml
apiVersion: kustomize.config.k8s.io/v1beta1
kind: Kustomization
helmCharts:
- name: intel-device-plugins-gpu
repo: https://intel.github.io/helm-charts/
version: 0.30.0
namespace: intel-device-plugins
releaseName: intel-device-plugins-gpu
includeCRDs: true
valuesFile: values.yaml# intel-device-plugins/gpu/values.yaml
name: igpu
sharedDevNum: 5
nodeFeatureRule: false
nodeSelector:
intel.feature.node.kubernetes.io/gpu: 'true'The specific Debian image used during the writing of this article was debian-12-backports-generic-amd64-20240429-1732. ↩︎
Linux kernel 6.1 and older reported not working by user calinet2 on Reddit: comment 1 comment 2. ↩︎ ↩︎
Linux kernel 6.8 reported having problem with hardware transcoding on the Plex forums. ↩︎ ↩︎