


If you plan to run stateful applications in your Kubernetes cluster, you quickly run into the question of where to store this state. A database is often the best solution, though writing to disk is sometimes the only — or at least easier, option.
In this article we’ll take a look at the Proxmox CSI Plugin, authored and maintained by Serge. This plugin is an implementation of the Container Storage Interface (CSI) for Kubernetes using Proxmox Virtual Environment backed volumes, which can be expanded to include e.g. Ceph.
The simplest solution for Kubernetes workloads is a hostPath volume, though that comes with its own warnings and caveats. Other options include NFS-mounting — which might be slow, or more complicated setup using Rook. A good middle ground might also be Longhorn.
Overview#
The Proxmox CSI Plugin assumes a Kubernetes instance running on VMs inside a Proxmox cluster. I’ve written about how to set up Kubernetes on Proxmox using OpenTofu in an earlier article, though there are of course other great resources on how to do this.
Proxmox CSI requires your Proxmox instance to be clustered, even though you only have one node. The plugin also requires correct labels on each Kubernetes node, indicating which region (Proxmox cluster) and zone (Proxmox node) the Kubernetes node is running on.
---
title: Overview of the the Proxmox cluster used in this article
---
flowchart TB
    subgraph cluster["Proxmox Cluster: Homelab (region)"]
        subgraph euclid["Node: Euclid (zone)"]
            vm01["VM: ctrl-01"]
        end
        subgraph abel["Node: Abel (zone)"]
            vm00["VM: ctrl-00"]
            vm10["VM: work-00"]
        end
        subgraph cantor["Node: Cantor (zone)"]
            vm02["VM: ctrl-02"]
        end
    end
    euclid --- abel --- cantor --- euclid
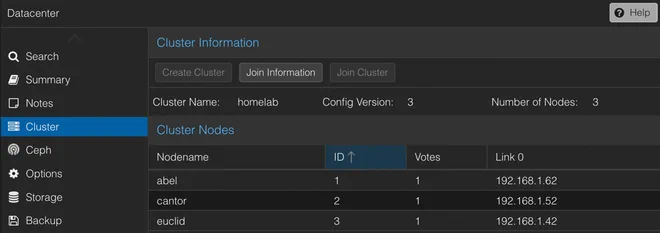
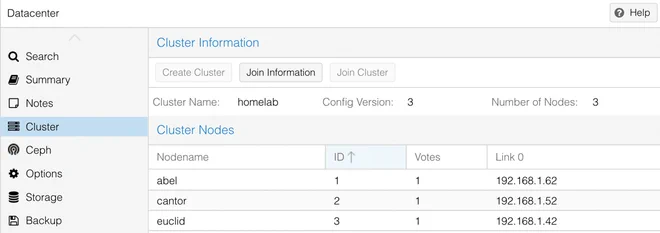
As an example we’ll use a three node Proxmox cluster called homelab consisting of three nodes
— abel,
cantor, and
euclid.
Each node hosts a virtual machine that we’ll use to create our Kubernetes cluster control plane
— ctrl-00, ctrl-01, and ctrl-02.
For convenience each VM will act as a control plane,
but with the corresponding taint
removed, allowing us to run regular workloads on them.
We’re also adding a fourth node on the abel node called work-00 which is only for workloads.
Initially,
we’ll create PersistentVolumes attached to
the ctrl-00 VM before we take a look at how the volumes can be moved around in our cluster.
Configuration#
Before taking advantage of the Proxmox CSI plugin we need to configure both our Proxmox cluster and Kubernetes installation.
Proxmox#
A prerequisite for the CSI plugin is a clustered Proxmox installation.
This can easily be done both through the web GUI and using the pvecm command line tool
as described in the Proxmox wiki.
In the web GUI the cluster setting is found under the Datacenter view as shown below.
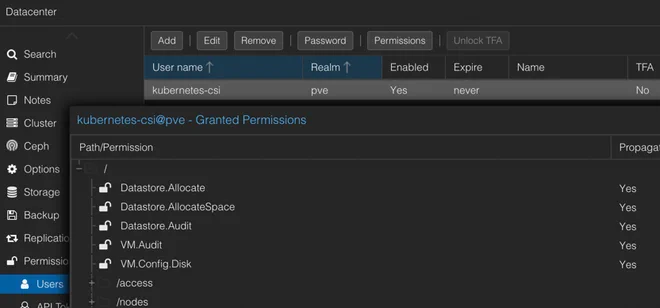
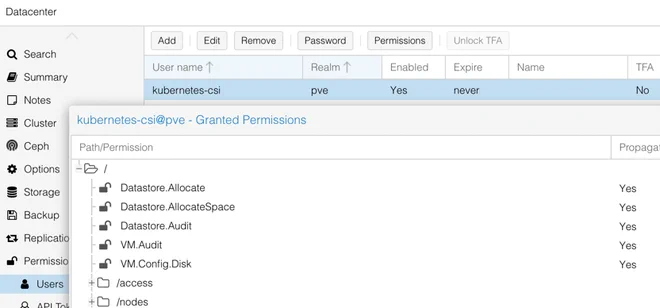
The CSI plugin also requires a Proxmox user to be able to automatically provision the requested storage.
Following
the Proxmox CSI Plugin readme,
this can be done using the pveum CLI-tool from one of the Proxmox nodes to create a CSI-role with the following
privileges
pveum role add CSI -privs "VM.Audit VM.Config.Disk Datastore.Allocate Datastore.AllocateSpace Datastore.Audit"We then create a new user called kubernetes-csi in the pve realm
pveum user add kubernetes-csi@pveand give it the CSI role we just created for all VMs
pveum aclmod / -user kubernetes-csi@pve -role CSIThe Tofu/Terraform code to create the above role and user can be found in the Summary section. In the web GUI this user should now look like in the figure below.
Having a user with only the required privileges at hand we can now create a token without privilege separation by running
pveum user token add kubernetes-csi@pve csi -privsep 0This should give you something similar to
┌──────────────┬──────────────────────────────────────┐
│ key          │ value                                │
╞══════════════╪══════════════════════════════════════╡
│ full-tokenid │ kubernetes-csi@pve!csi               │
├──────────────┼──────────────────────────────────────┤
│ info         │ {"privsep":"0"}                      │
├──────────────┼──────────────────────────────────────┤
│ value        │ c00010ff-f00d-c0de-dead-dabbad00cafe │
└──────────────┴──────────────────────────────────────┘
where we’re interested in the value field for the next section.
Finally, make sure that the VM name in Proxmox matches the node hostname
— i.e. the hostname of Proxmox VM ctrl-00 should be ctrl-00,
as Proxmox CSI Plugin needs this information in order to provision a disk to the correct VM.
This can be an issue you’re using e.g. Talos,
— which generates a random hostname by default,
as reported
by @breakingflower on GitHub.
Kubernetes#
The Proxmox CSI plugin needs to know the topology of our Kubernetes cluster to be able to provision storage on the correct node. In order to determine cluster topology, the plugin uses the well-known topology.kubernetes.io/region and topology.kubernetes.io/zone labels.
To help with the labelling, Serge has created Proxmox Cloud Controller Manager (CCM) — an implementation of Kubernetes Cloud Controller Manager. It’s unfortunately a bit finicky to configure correctly, so I ended up throwing in the towel and labelling the Kubernetes nodes manually
kubectl label nodes --all topology.kubernetes.io/region=homelab
kubectl label node ctrl-00 work-00 topology.kubernetes.io/zone=abel
kubectl label node ctrl-01 topology.kubernetes.io/zone=euclid
kubectl label node ctrl-02 topology.kubernetes.io/zone=cantor
With the nodes labelled we can install the Proxmox CSI plugin either through Helm, or Kustomize following the readme.
The plugin is configured using a Secret with the cluster information
| |
filling in <NODE> (line 10) with either a node IP or hostname of one of the Proxmox nodes.
If you’re using a self-signed certificate you might have to enable an insecure connection (line 11).
The token_id (line 12) should be the user we created in the previous section with the associated token in
the token_secret field (line 13).
The region (line 14) should correspond to the Proxmox cluster name.
Next we create a StorageClass definition that uses
the Proxmox CSI plugin as a provisioner (line 14)
| |
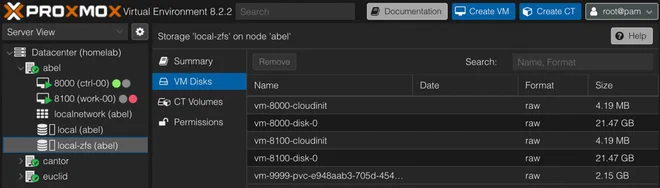
The storage parameter (line 9) must also match a Proxmox storage ID supporting disk image content as shown in the
picture below
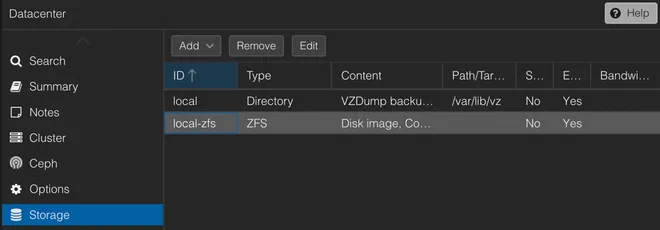
More options for the Proxmox CSI Plugin Storage Class are described in the documentation.
With the configuration in place we can install Proxmox CSI plugin by fetching the relevant manifests directly from the GitHub repository from a given tag
# k8s/proxmox-csi/kustomization.yaml
apiVersion: kustomize.config.k8s.io/v1beta1
kind: Kustomization

resources:
  - https://raw.githubusercontent.com/sergelogvinov/proxmox-csi-plugin/v0.7.0/docs/deploy/proxmox-csi-plugin-release.yml
  - proxmox-csi-config.yaml
  - storage-class.yaml
If everything is working as expected, you should be able to run
kubectl get csistoragecapacities -ocustom-columns=CLASS:.storageClassName,AVAIL:.capacity,ZONE:.nodeTopology.matchLabels -Ato display the available storage on each node
proxmox-csi   821991632Ki   map[topology.kubernetes.io/region:homelab topology.kubernetes.io/zone:euclid]
proxmox-csi   916754956Ki   map[topology.kubernetes.io/region:homelab topology.kubernetes.io/zone:cantor]
proxmox-csi 960049560Ki map[topology.kubernetes.io/region:homelab topology.kubernetes.io/zone:abel]Usage#
Using Proxmox CSI Plugin to provision PersistentVolumes is done by referencing the proxmox-csi StorageClass we
just created.
We’ll take a look at creating ephemeral volumes as well as more persistent volumes.
Ephemeral volumes#
Ephemeral means short-lived. In the context of Kubernetes, an ephemeral volume is a volume that follows a Pod’s lifetime and is defined inline with the Pod spec
| |
Notice we’ve bound the pod to the ctrl-00 Kubernetes node (line 9) and referenced the proxmox-csi StorageClass on
line 23.
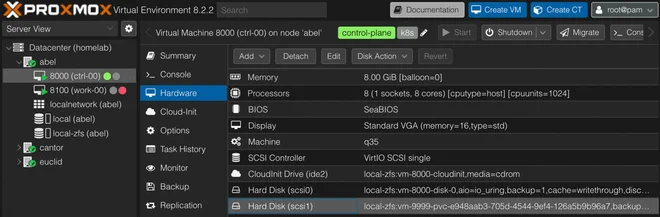
Applying the above manifest we should now see both a PersistentVolumeClaim and a PersistentVolume created along with
the Pod
kubectl get pod,pv,pvc -n proxmox-csi-test
NAME READY STATUS RESTARTS AGE
pod/pod-test 1/1 Running 0 51m
NAME CAPACITY ACCESS MODES RECLAIM POLICY STATUS CLAIM STORAGECLASS VOLUMEATTRIBUTESCLASS REASON AGE
persistentvolume/pvc-e948aab3-705d-4544-9ef4-126a5b9b96a7 2Gi RWO Retain Bound proxmox-csi-test/pod-test-ephemeral-volume proxmox-csi <unset> 51m
NAME STATUS VOLUME CAPACITY ACCESS MODES STORAGECLASS VOLUMEATTRIBUTESCLASS AGE
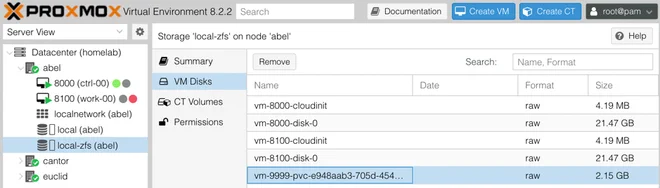
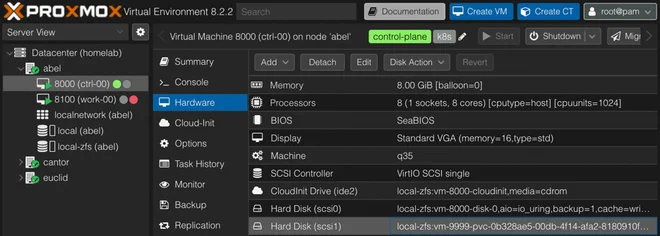
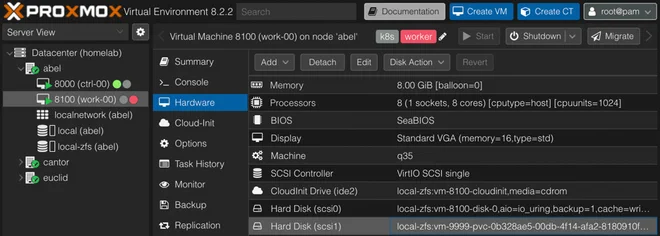
persistentvolumeclaim/pod-test-ephemeral-volume Bound pvc-e948aab3-705d-4544-9ef4-126a5b9b96a7 2Gi RWO proxmox-csi <unset> 51mThe volume can also be seen attached to the ctrl-00 VM in the Proxmox Web GUI
Since the Pod manifest creates an ephemeral volume — meaning it will be recreated together with the pod and the previous data lost, we can schedule this Pod on all of our nodes.
Deleting the pod, the volume should also be removed from the VM.
Since we’ve chosen a Retain reclaimPolicy for the StorageClass we’re using,
the disk won’t be deleted and can be found on the Proxmox node.
This makes it easier to recover data in case the persistent volume was deleted prematurely by mistake.
Recreating the Pod a new volume is provisioned, meaning that you should consider a different reclaimPolicy if you plan on running many short-lived Pods with ephemeral volumes.
Persistent volumes#
Using a CSI driver we can create a PersistentVolume using a PersistentVolumeClaim
| |
The StorageClass we’re using (line 8) is configured with volumeBindingMode to WaitForFirstConsumer,
so we need to said consumer, which can be a Deployment Pod
| |
We’ve bound the Deployment Pod to the ctrl-00 node (line 21) which is where the persistentVolumeClaim referenced
on line 32 will thus have its volume provisioned.
To be able to move the Deployment Pod to a different node we need to detach the volume before trying to start the Pod
on the other node.
This can be done by setting the Deployment type
to Recreate (line 10),
which kills existing pod
— thus detaching the volume,
before starting it on a different node since we’re using the
ReadWriteOnce accessMode.
Deleting the Deployment will keep the provisioned volume attached to the node,
and recreating it should attach it again with the data intact.
Schematically this looks like the graph below
---
title: Disk attached to VM ctrl-00 on abel node
---
flowchart TB
    subgraph cluster["Proxmox Cluster: Homelab (region)"]
        subgraph euclid["Node: Euclid (zone)"]
            vm01["VM: ctrl-01"]
        end
        subgraph abel["Node: Abel (zone)"]
            direction BT
            vm00["VM: ctrl-00"]
            vm10["VM: work-00"]
            pv00["Disk: pvc-0b32..."]
        end
        subgraph cantor["Node: Cantor (zone)"]
            vm02["VM: ctrl-02"]
        end
    end
    euclid --- abel --- cantor --- euclid
    pv00 -.- vm00
To move the Pod to a different node we can change the nodeSelector field of the Pod spec in the Deployment to e.g.
kubernetes.io/hostname: work-00.
This will prompt the Proxmox CSI Plugin to move the provisioned volume from the ctrl-00 node to the work-00 node.
Since both nodes are running on the same Proxmox hypervisor host (zone),
the plugin is able to move the disk automatically.
---
title: Disk attached to VM work-00 on abel node
---
flowchart TB
    subgraph cluster["Proxmox Cluster: Homelab (region)"]
        subgraph euclid["Node: Euclid (zone)"]
            vm01["VM: ctrl-01"]
        end
        subgraph abel["Node: Abel (zone)"]
            direction BT
            vm00["VM: ctrl-00"]
            vm10["VM: work-00"]
            pv00["Disk: pvc-0b32..."]
        end
        subgraph cantor["Node: Cantor (zone)"]
            vm02["VM: ctrl-02"]
        end
    end
    euclid --- abel --- cantor --- euclid
    pv00 -.- vm10
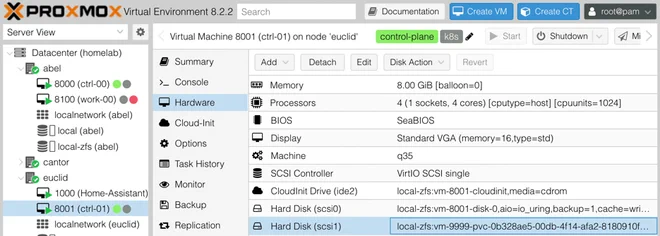
If we instead change the nodeSelector to ctrl-01
— which is hosted on euclid, a different Proxmox node/zone,
we’ll be met with
0/4 nodes are available: 1 node(s) had volume node affinity conflict, 3 node(s) didn't match Pod's node affinity/selector.
preemption: 0/4 nodes are available: 4
Preemption is not helpful for scheduling.
According to the author this
is due to a limitation in the Kubernetes API,
though he has graciously created a CLI tool to overcome this shortcoming,
called pvecsictl.
The pvecsictl tool is available from the Proxmox CSI Plugin repository as
a Release and takes configuration similar to the plugin
| |
The tool requires root-privileges since it’s POST-ing to an experimental endpoint which is root only.
Running pvecsictl with the following arguments we move the disk to the euclid node
pvecsictl migrate --config=cmd/config.yaml -n proxmox-csi-test pvc-test euclid
INFO moving disk vm-9999-pvc-0b328ae5-00db-4f14-afa2-8180910f456d to proxmox node euclid
INFO replacing persistentvolume topology
INFO persistentvolumeclaims pvc-test has been migrated to proxmox node euclid
With the disk moved to the same physical node where we’ve constrained the Pod to run, it has no trouble starting up, and we should find the same data on the volume

or schematically as
---
title: Disk attached to VM ctrl-01 on euclid node
---
flowchart TB
    subgraph cluster["Proxmox Cluster: Homelab (region)"]
        subgraph euclid["Node: Euclid (zone)"]
            direction BT
            vm01["VM: ctrl-01"]
            pv00["Disk: pvc-0b32..."]
        end
        subgraph abel["Node: Abel (zone)"]
            vm00["VM: ctrl-00"]
            vm10["VM: work-00"]
        end
        subgraph cantor["Node: Cantor (zone)"]
            vm02["VM: ctrl-02"]
        end
    end
    euclid --- abel --- cantor --- euclid
    pv00 -.- vm01
Doing the above with a StatefulSet is left
as an exercise to the reader
| |
Addendum#
Proxmox CSI#
My opinion of the Proxmox CSI plugin is of a great middle ground between ease-of-use and abstraction. The provisioned disks can relatively easily be mounted in a different VM/container if needed to inspect the data on them. It’s also possible to configure VM backups with the disk included, though some care should be taken if you decide to do this.
In the future I’d like to experiment with shared storage like Ceph on Proxmox to see if the extra overhead is worth it in my humble homelab.
Proxmox CCM#
It bothers me that I didn’t get Proxmox CCM to work properly. Trying to follow The Noflake Manifesto I want the VMs to be interchangeable without much fuss, having something automatically label the node topology would help with this. Scheduling a Kubernetes VM on a different Proxmox node would mean that I need to manually change the labels.
When I started writing this article I initially used a Debian image
and my own cloud-init debauchery to get Kubernetes up and
running.
I tried
following tips
from
GitHub issues,
adding KUBELET_EXTRA_ARGS="--node-ip=192.168.1.100 --cloud-provider=external" in /etc/default/kubelet and restarting
the kubelet service, but to no avail.
While writing this article I also switched over to using Talos (more on that later!). I therefore postponed looking at Proxmox CCM and instead labelled the nodes manually.
Named volumes#
The volumes created are given a randomly generated UUID
which doesn’t tell you anything about which resource owns the volume.
I optimistically tried setting
the spec.volumeName
field in a PersistentVolumeClaim which I thought might be used to name a volume,
but it’s used to bind to existing volumes, not create new ones.
A recent GitHub issue addresses the naming issue,
though I figured out you can manually create a VM disk using pvesm
— Proxmox VE Storage Manager,
which you can then refer to in a PersistentVolume.
As an example,
say we want to create a config volume for an application running on the ctrl-00 node with VM ID 8000.
The ctrl-00 Kubernetes node is hosted on the abel hypervisor in the homelab cluster.
First, open a shell on abel and run
pvesm alloc local-zfs 8000 vm-8000-app-config 1GThis will allocate 1 GB on the local-zfs storage for VM 8000 and be named vm-8000-app-config.
We can then reference the manually allocated disk in the volumeHandle field of a PersistentVolume (line 18),
and consequently reference the PersistentVolume using the volumeName field in a PersistentVolumeClaim (line 30)
| |
Although this approach isn’t scalable, it works for a small amount of volumes if the disk name is important.
Summary#
Since I can be a bit verbose, I like to succinctly summarise the setup at the end. All the resources used in this article can be found in the GitLab repo for this blog here.
❯ tree
.
├── k8s
│   └── proxmox-csi
│       ├── kustomization.yaml
│       ├── proxmox-csi-config.yaml
│       └── storage-class.yaml
└── tofu
    └── kubernetes-csi-user.tf
To get Proxmox CSI running you first need cluster the Proxmox installation, even if you only have one node. Next you should create a dedicated CSI-role and Proxmox user. Using BGP’s Proxmox Terraform Provider this can be done with the following configuration
# tofu/kubernetes-csi-user.tf
resource "proxmox_virtual_environment_role" "csi" {
  role_id    = "CSI"
  privileges = [
    "VM.Audit",
    "VM.Config.Disk",
    "Datastore.Allocate",
    "Datastore.AllocateSpace",
    "Datastore.Audit"
  ]
}

resource "proxmox_virtual_environment_user" "kubernetes-csi" {
  user_id  = "kubernetes-csi@pve"
  acl {
    path      = "/"
    propagate = true
    role_id   = proxmox_virtual_environment_role.csi.role_id
  }
}
On the Kubernetes side of things, you first need to correctly label your nodes — either manually or using Proxmox CCM, before applying the following kustomization
# k8s/proxmox-csi/kustomization.yaml
apiVersion: kustomize.config.k8s.io/v1beta1
kind: Kustomization

resources:
  - https://raw.githubusercontent.com/sergelogvinov/proxmox-csi-plugin/v0.7.0/docs/deploy/proxmox-csi-plugin-release.yml
  - proxmox-csi-config.yaml
  - storage-class.yaml
# k8s/proxmox-csi/proxmox-csi-config.yaml
apiVersion: v1
kind: Secret
metadata:
name: proxmox-csi-plugin
namespace: csi-proxmox
stringData:
config.yaml: |
clusters:
- url: "https://<NODE>:8006/api2/json"
insecure: true
token_id: "kubernetes-csi@pve!csi"
token_secret: "<TOKEN>"
region: homelab# k8s/proxmox-csi/storage-class.yaml
apiVersion: storage.k8s.io/v1
kind: StorageClass
metadata:
name: proxmox-csi
allowVolumeExpansion: true
parameters:
csi.storage.k8s.io/fstype: ext4
storage: local-zfs
cache: writethrough
ssd: "true"
mountOptions:
- noatime
provisioner: csi.proxmox.sinextra.dev
reclaimPolicy: Retain
volumeBindingMode: WaitForFirstConsumerProxmox CSI plugin can move PersistentVolumes between VMs on the same hypervisor node.
To move volumes to a VM on a different hypervisor node you can use the pvecsictl tool.